How to Remove Scratches from Dining Room Table
Scratches on your dining room table can detract from its overall appeal and make it look less inviting. Fortunately, there are several methods you can employ to remove or minimize these unsightly marks. Let's explore some effective techniques to help you restore your table's glossy finish and make it the centerpiece of your dining room once again.
Before we delve into the various methods, it's crucial to understand that the best approach depends on the type of finish your table has. Whether it's a varnished, lacquered, or painted surface, each requires a slightly different treatment. So, let's first identify your table's finish and then proceed with the appropriate technique.
Identifying Your Table's Finish
Inspect the surface of your table closely. If it has a glossy, hard, and smooth surface, it's likely varnished or lacquered. These finishes are usually applied to wooden tables. On the other hand, if the surface is matte or has a slightly textured feel, it might be painted or have a distressed finish.


Another way to determine the finish is by checking the edges of the table. Varnished or lacquered tables typically have a smooth, continuous edge, while painted or distressed tables may have visible brush strokes or a more rugged edge.
Varnished or Lacquered Table
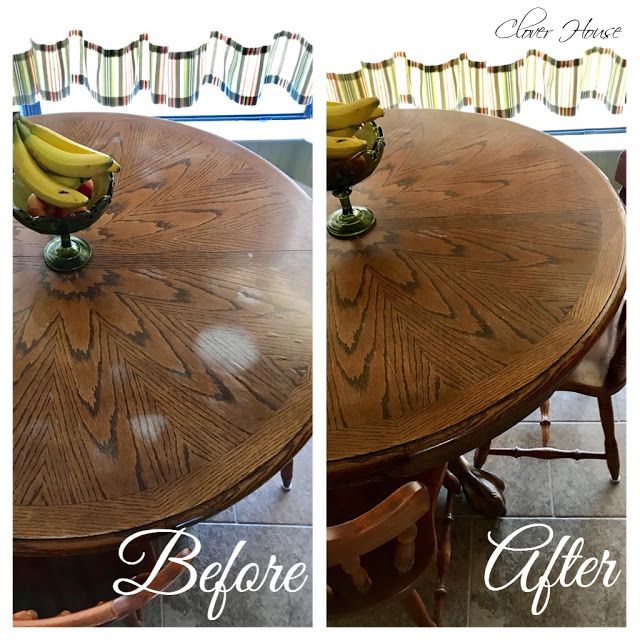
Varnished and lacquered tables are protected by a clear, hard coating that enhances the wood's natural beauty. To remove scratches from these surfaces, you'll need to gently sand, buff, and polish the area. Here's a step-by-step guide:


1. Lightly sand the scratch using a fine-grit sandpaper (around 220-grit) in the direction of the wood grain. Be careful not to sand too hard or too much, as this can cause further damage or create a new scratch.
2. Wipe the area with a damp cloth to remove any sanding dust.
3. Apply a small amount of furniture polish or wood wax to a soft, clean cloth and gently buff the scratch in circular motions. The polish or wax will help fill in the scratch and restore the table's glossy finish.




Painted or Distressed Table
For painted or distressed tables, the approach is slightly different. Since these tables have a more forgiving surface, you can usually touch up the scratch with a bit of paint and touch-up marker. Here's how:
1. Gently sand the scratch with a fine-grit sandpaper to help the paint adhere better.
2. Wipe the area with a damp cloth to remove any sanding dust.


3. Using a touch-up marker or a small paintbrush, apply a thin layer of paint that matches the table's finish. Be sure to choose a paint that's compatible with the existing finish (e.g., oil-based for oil-based paint, water-based for water-based paint).
4. Allow the paint to dry completely, following the manufacturer's instructions.
5. Gently sand the area again with a very fine-grit sandpaper (around 400-grit) to smooth out any raised edges or imperfections.
6. Wipe the area with a damp cloth and apply a thin layer of clear furniture wax or sealant to protect the touch-up and restore the table's finish.
Preventing Future Scratches
While it's impossible to completely prevent scratches on your dining room table, there are some steps you can take to minimize their occurrence:
1. Use coasters: Encourage your guests and family members to use coasters to protect the table from moisture and heat damage, which can lead to scratches and rings.
2. Avoid placing heavy objects directly on the table: Use protective pads or felt furniture sliders under heavy items like vases, lamps, or decorative objects to prevent scratches.
3. Be cautious with sharp objects: Keep knives, forks, and other sharp objects away from the table's surface to prevent accidental scratches.
4. Clean up spills promptly: Quickly wipe up any spills or messes to prevent liquids from seeping into the table's finish and causing damage.
By following these tips and techniques, you can effectively remove or minimize scratches on your dining room table and keep it looking beautiful for years to come. Regular maintenance and care will not only help preserve your table's finish but also ensure that it remains a cherished focal point in your home.
Related Articles
Fix Scratches on Dining Table: Easy DIY Tips
Discovering scratches on your dining room table can be disheartening, especially if it's a cherished piece of furniture. But before you consider replacing it...

Wood Dining Room Table & Chairs Set of 6
Transform your dining space into a warm, inviting haven with a set of six wood dining room chairs. A well-crafted chair set not only provides comfort and...

How to Remove Stains from Upholstered Dining Chairs
Accidents happen, and your once pristine upholstered dining chairs may now bear witness to spilled wine, tomato sauce, or even ink stains. But fear not, for...

Shiplap Dining Room Table Ideas
Transform your dining room into a rustic haven with the timeless charm of a shiplap dining room table. This classic design element, popularized by HGTV's Fixer...

Dress Your Dining Room Table for Downtime
When your dining room table isn't in use, it's essential to keep it well-maintained and protected. Not only does this ensure its longevity, but it also adds to...

How to Remove Scratches from Wood Dresser
Discovering unsightly scratches on your beloved wood dresser can be disheartening, but don't despair. With the right techniques and a little elbow grease, you...