Step-by-Step: Installing Wood Balusters on Deck Stairs
Installing wood balusters on deck stairs is a crucial step in enhancing both the safety and aesthetic appeal of your outdoor space. Balusters not only provide support and stability but also add a touch of elegance to your deck. This comprehensive guide will walk you through the process, ensuring you achieve professional results that will last for years to come.
Before you begin, it's essential to gather the right tools and materials. You'll need a tape measure, a level, a circular saw, a drill, screws, wood glue, and, of course, your wood balusters. Having these items on hand will make the installation process smoother and more efficient.
Preparation and Measurement
Accurate measurement is key to a successful installation. Start by measuring the rise of your stairs, which is the vertical distance between each step. This measurement will determine the height of your balusters.


Next, measure the width of your stairs to determine how many balusters you'll need. Standard baluster spacing is about 4 inches on center, but local building codes may require a maximum gap of 4 inches. Always check your local regulations to ensure compliance.
Choosing the Right Balusters
Wood balusters come in various styles, from simple and classic to intricate and ornate. Choose a style that complements your deck's design and your personal taste. Consider the size of your balusters as well. They should be wide enough to provide adequate support but narrow enough to allow for visibility through the railing.


Additionally, consider the wood species. Pressure-treated lumber is a popular choice for outdoor applications due to its resistance to rot and decay. However, if you prefer a specific wood species, ensure it's suitable for outdoor use and properly treated to withstand the elements.
Gathering Tools and Materials
In addition to the tools mentioned earlier, you may also need a jigsaw for cutting intricate baluster designs, a chisel for notching balusters around newel posts, and a sander for smoothing any rough edges. For materials, you'll need screws that are long enough to penetrate the baluster and the stringer (the supportive structure of your stairs) by at least 1 inch.
Wood glue is also essential for reinforcing the joints between balusters and stringers. It's recommended to use an exterior-grade wood glue that's water-resistant and suitable for outdoor use.


Installing Balusters on Stair Stringers
With your measurements taken and materials gathered, you're ready to begin installing your balusters. Start by laying out your balusters on the stringers, spacing them according to your measurements. Use a level to ensure they're plumb (vertical) and a pencil to mark their positions.
Before you start drilling, it's a good idea to pre-drill holes in your balusters. This will prevent the wood from splitting when you drive in the screws. Use a drill bit that's slightly smaller than the diameter of your screws to create these pilot holes.
Attaching Balusters to Stringers
Starting at the bottom of your stairs, apply wood glue to the top and bottom of the first baluster. Align it with your pencil mark and drive a screw through the pre-drilled hole and into the stringer. Repeat this process for each baluster, working your way up the stairs.


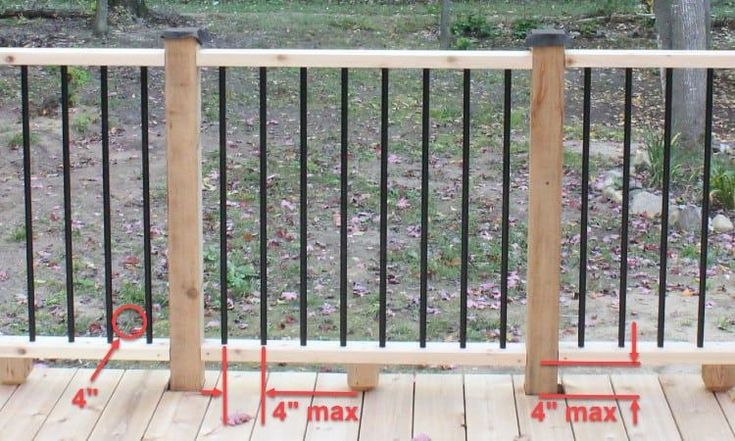


It's crucial to ensure that each baluster is plumb and level as you install it. Use a level to check the vertical alignment and adjust as necessary. If you encounter a baluster that doesn't fit perfectly due to variations in the stringer, you may need to use a jigsaw to cut it to size or a chisel to notch it around the newel post.
Finishing Touches
Once all your balusters are installed, you can fill any screw holes with wood filler and sand them smooth. This will give your balusters a professional, finished look. If desired, you can also stain or paint your balusters to match your deck's color scheme.
Finally, install your railing. This will provide the top support for your balusters and complete the look of your deck stairs. Ensure your railing is securely attached to the balusters and stringers to provide maximum safety and stability.
Installing wood balusters on deck stairs is a rewarding project that enhances both the safety and aesthetics of your outdoor space. With careful planning, accurate measurement, and a bit of patience, you can achieve professional results that will last for years to come. So, why wait? Start your project today and enjoy the fruits of your labor with peace of mind and added curb appeal.
Related Articles
Step-by-Step Guide: Installing Wood Balusters on Your Deck
Installing wood balusters on a deck not only enhances its aesthetic appeal but also ensures safety by providing proper rail support. This guide will walk you...
Step-by-Step Guide: Installing Aluminum Balusters on Deck
Transforming your deck into a safe and stylish space is a rewarding DIY project. Installing aluminum balusters not only enhances the aesthetics but also...
Step-by-Step: Installing Round Balusters on Your Deck
Installing round balusters on your deck can significantly enhance its appearance and safety. This guide will walk you through the process, ensuring your deck...
Mastering Staircase Beauty: A Step-by-Step Guide to Installing Wooden Balusters
Embarking on a staircase renovation project? Installing wooden balusters can significantly enhance your stairs' aesthetic appeal and safety. This comprehensive...

Mastering Staircase Safety: A Step-by-Step Guide to Installing Round Balusters
Installing round balusters on stairs can significantly enhance the aesthetics and safety of your staircase. This guide will walk you through the process...

Step-by-Step Guide: Installing Aluminum Balusters on Stairs
Installing aluminum balusters on stairs can significantly enhance the aesthetics and safety of your staircase. Aluminum is durable, low-maintenance, and offers...