How to Cover a Metal Roof: Step-by-Step Guide
Embarking on a project to cover a metal roof? You're in the right place. This comprehensive guide will walk you through the process, ensuring your roof is protected and looking great. Let's dive in.
Metal roofs are durable, long-lasting, and energy-efficient, but they still need protection from the elements and extra heat. A cover can extend their lifespan and improve their appearance. Here's how to do it right.
Understanding Metal Roof Covers
Before we start, let's understand what we're working with. Metal roof covers come in various materials like asphalt shingles, tile, or metal itself. Each has its pros and cons, so choose based on your climate, budget, and aesthetic preferences.


In this guide, we'll focus on asphalt shingles, a popular and affordable option. They're easy to install, provide good insulation, and can mimic the look of other materials.
Preparation: Inspect and Clean
Before you start, inspect your metal roof for any damage. Clean it thoroughly to remove dirt, debris, and moss. This ensures your new cover adheres properly and lasts longer.
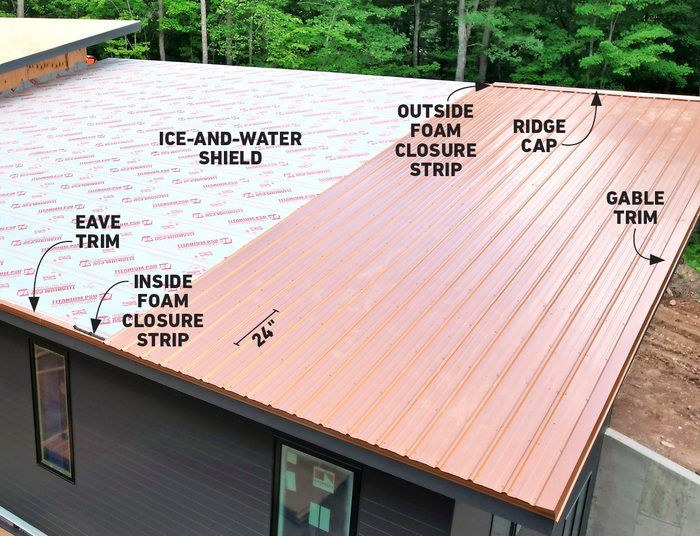


Use a solution of bleach and water to kill moss and algae, then rinse off with a pressure washer. Allow the roof to dry completely before proceeding.
Choose the Right Underlayment
Underlayment is the barrier between your metal roof and the shingles. It protects against moisture and provides an extra layer of insulation. Opt for a synthetic, breathable underlayment for best results.
Lay the underlayment in horizontal strips, overlapping each row by at least 4 inches. Secure it with roofing nails or staples, following the manufacturer's instructions.


Installing Asphalt Shingles
Now that your metal roof is clean and prepped, it's time to install the shingles. Here's a step-by-step process:
Start from the bottom left corner of your roof, working your way up and across. This ensures a neat, staggered pattern that sheds water effectively.
Laying the Starter Course
The starter course is the first row of shingles at the bottom of your roof. It helps direct water away from the edges and provides a base for the rest of the shingles.


Lay the starter shingles along the eaves, ensuring they overhang the drip edge by about 1/2 inch. Secure them with roofing nails, following the manufacturer's nailing pattern.
Installing the Field Courses
The field courses are the rest of the shingles that cover the main part of your roof. Start the first row with a full shingle, then stagger each subsequent row by at least 6 inches to create a strong, water-resistant barrier.
Secure each shingle with roofing nails, spacing them according to the manufacturer's instructions. Ensure the nails are driven in straight and don't penetrate the shingle's self-sealing strip.
Ventilation and Flashing
Proper ventilation is crucial for a long-lasting roof. Install ridge vents or other ventilation systems according to the manufacturer's instructions.
Flashing is essential around chimneys, skylights, and other penetrations. Use flashing designed for metal roofs to ensure a watertight seal.
Caring for Your New Roof Cover
Congratulations, you've just covered your metal roof! But the work doesn't stop there. Regular maintenance is key to keeping your roof in top shape.
Inspect your roof annually, looking for signs of damage or wear. Clear debris, trim back trees, and keep gutters clean to prevent water buildup. With proper care, your new roof cover should last for decades.
When to Call a Professional
While many homeowners can cover their metal roofs themselves, some jobs are best left to the pros. If you're unsure about any part of the process, or if you notice significant damage, don't hesitate to call a licensed roofing contractor.
They have the experience and tools to ensure your roof is covered correctly and safely.
And there you have it! With these steps, you're well on your way to a protected, beautiful metal roof. Happy covering!
Related Articles

Enhance Your Pergola: Step-by-Step Guide to Adding a Metal Roof
Transforming your pergola into a durable, weather-resistant structure with a metal roof is an excellent way to enhance its longevity and functionality. Metal...

How to Build a Metal Roof Over a Deck: A Step-by-Step Guide
Embarking on a home improvement project like building a metal roof over your deck can significantly enhance your outdoor living space, providing durability...

How to Build a Pergola with a Roof: Step-by-Step Guide
Building a pergola with a roof can enhance your outdoor space, providing shade and a cozy atmosphere. This step-by-step guide will help you construct a...
How to Build a Roof Over a Deck: Step-by-Step Guide
Transforming your deck into an inviting, weather-protected outdoor living space is an exciting project. Building a roof over your deck not only extends your...

Mastering Shower Curb Coverage: A Step-by-Step Guide
When it comes to renovating or updating your bathroom, one aspect that often gets overlooked is the shower curb. This small but crucial element can...

Metal Bucket Manufacturing: A Step-by-Step Guide
Metal buckets are indispensable containers used in various industries and households for storing and transporting materials. But have you ever wondered how...