DIY Infrared Sauna: Build Your Own at Home
Embracing the benefits of infrared sauna therapy at home has never been more accessible. Building your own infrared sauna allows you to enjoy the rejuvenating experience of a sauna in the comfort of your home, at your convenience. This comprehensive guide will walk you through the process of constructing an infrared sauna, from planning to completion.
Before we dive into the construction process, let's briefly explore the advantages of infrared saunas. Unlike traditional saunas, infrared saunas use light to create heat, which is more gentle on the body. This heat penetration promotes better detoxification, improved circulation, and relaxation. Now, let's get started on your DIY infrared sauna project.
Planning Your Infrared Sauna
Before you begin construction, it's crucial to plan your sauna carefully. Consider the size, location, and materials you'll use. A standard sauna is about 60" wide, 48" deep, and 72" tall, but you can adjust these dimensions to fit your space.


Choose a location that's convenient and easy to access. Ensure the area is well-ventilated and has a dedicated electrical circuit for the sauna. Once you have your plans in place, it's time to gather your materials and tools.
Materials and Tools Needed
Here's a list of materials and tools you'll need for your infrared sauna project:

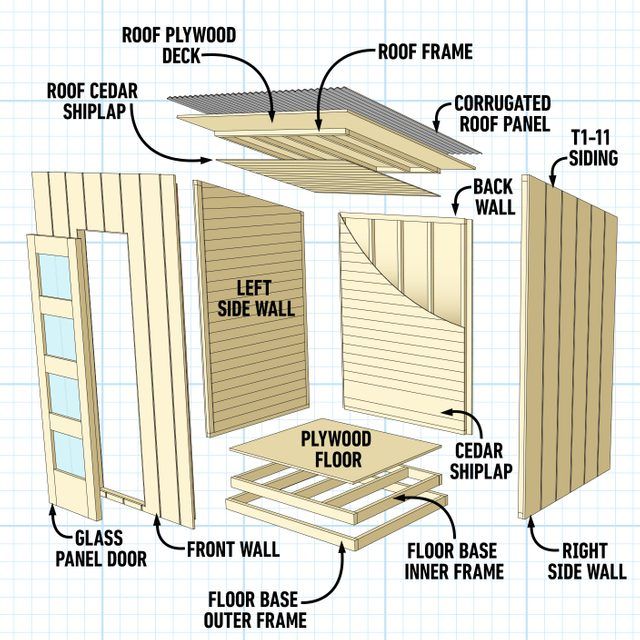

- Cedar or Hemlock wood for the interior
- Plywood for the floor and ceiling
- Infrared heaters
- Insulation
- Vapor barrier
- Roofing material (if building an outdoor sauna)
- Sauna controller
- Tools: Circular saw, jigsaw, drill, screwdrivers, tape measure, safety glasses, gloves, and ear protection
Designing Your Sauna's Interior
Consider the layout and features you want in your sauna. Benches, backrests, and footrests can enhance your comfort. You might also want to include a control panel for easy temperature adjustment.
Once you have your design finalized, it's time to start building. Begin by constructing the sauna's frame, ensuring it's square and level. Then, install the insulation and vapor barrier to maintain heat and prevent moisture buildup.
Installing the Infrared Heaters
Infrared heaters are the heart of your sauna. They come in various sizes and wattages, so choose ones that fit your sauna's dimensions and provide the desired heat output. Typically, you'll need about 1.5 to 2.5 watts per square foot.


Mount the heaters on the walls and ceiling, ensuring they're secure and won't be damaged by heat or moisture. Connect the heaters to the sauna controller, which allows you to adjust the temperature and set timers.
Wiring the Sauna
Wiring the sauna correctly is crucial for safety and functionality. Hire a licensed electrician if you're not comfortable doing this yourself. They'll ensure the wiring is up to code and that the sauna is connected to a dedicated 240-volt circuit.
After the electrical work is complete, it's time to install the interior wood paneling. Cedar and hemlock are popular choices due to their durability and resistance to heat and moisture. Leave gaps between the boards to allow for air circulation.


Finishing Touches
Once the interior is complete, install the benches, backrests, and any other features you've designed. Finally, apply a clear sealant to protect the wood and make cleanup easier.
Before using your sauna, test it thoroughly to ensure everything is working correctly. Start with low temperatures and gradually increase them to avoid overheating. Always follow safety guidelines when using your infrared sauna.
Building an infrared sauna at home is a rewarding project that allows you to enjoy the numerous benefits of sauna therapy in the comfort of your own space. With careful planning and attention to detail, you can create a sauna that's perfect for your needs and budget. So, start planning your project today and look forward to the many health benefits that await you in your new infrared sauna.
Related Articles

How Much to Build a Sauna Room at Home
Building a sauna room in your house can be an excellent addition, enhancing your home's value and providing a relaxing, rejuvenating space. But how much does...

Home Sauna Design Ideas: Transform Your Space
Embracing the warmth and tranquility of a sauna at home is an increasingly popular trend, transforming ordinary bathrooms into personal oases of relaxation...

Unveiling the Best Home Sauna Options: Your Ultimate Guide
Embarking on a quest to create a personal oasis at home? A sauna can be an excellent addition, offering numerous health benefits and providing a serene...

Infrared Sauna Wrap Near Me: Experience the Heat at Home
Feeling the chill of winter or just looking to boost your wellness routine? You might want to consider the benefits of an infrared sauna wrap near you. These...

"DIY Indoor Sauna: How to Build at Home"
Transforming your home into a personal oasis of relaxation and rejuvenation is now more achievable than ever. Building an indoor sauna can provide numerous...

Where to Place a Sauna in Your Home: Ultimate Guide
Are you dreaming of transforming your home into a personal oasis of relaxation and rejuvenation? A sauna can be the perfect addition, offering numerous health...